If the Blog module is active on your site, you can start writing posts. Your posts can contain both text and images, and can be published immediately or at a later date.
Title and Content Boxes
Title and Content Boxes are the most noticeable areas on the Add New Post screen (see the screenshot below).
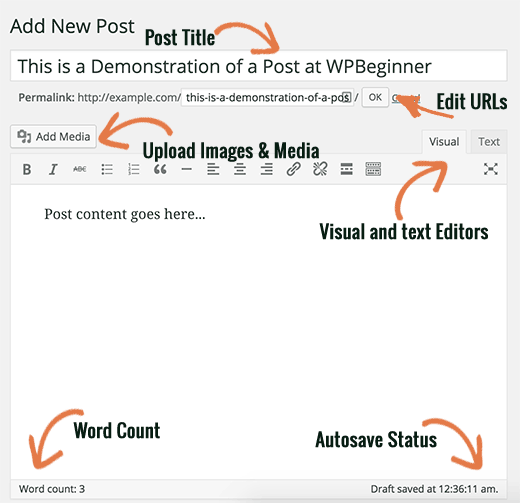
The first text area on the top is where you add the post’s title.
The content area is where you will write your post. You can use the formatting options from the toolbar or use one of the many keyboard shortcuts available which will speed up your writing process.
In the footer area of the content editor, WordPress will show you the word count for your post. And, as you write, WordPress will automatically save a draft of your post.
As soon as you save your draft or write more content, WordPress cleans up your autosave temporary draft and replaces it with a new one. This process ensures that you do not lose your content due to internet connection or hardware failure.
Excerpts
You can use this box to add a short summary or excerpt for your post.
Ideally, you should display summary or excerpt for your posts on your site’s front-page and archives. Full content should only be displayed on the post’s single page.
Add Images and Media
Between the title and content fields, there is a large Add Media button. You will need to click on it when you want to upload an image or any other media to your blog post. This will launch the media uploader in a popup window.
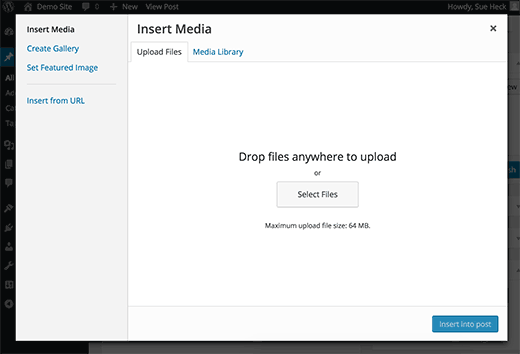
Simply click on the select files button to upload images or drag and drop the image file from your desktop to the Media Library area. You can also create image galleries and audio playlists from uploaded files. Maximum upload file size is 2 MB.
Using the Gallery Block
The Gallery option prompts you to upload other images and presents a simple gallery. The settings on the right-hand side allows you to decide how many columns to use, and whether to crop the images automatically. This is a very quick and powerful way to add a gallery.

Publishing Options
The post edit screen is divided into two columns. The column on your left contains the post title, content editor, summary and excerpts fields. On your right hand side, you have different meta boxes to configure post settings.
The top most meta box in this column is labeled Publish. This is where all the publishing options for your posts are managed.
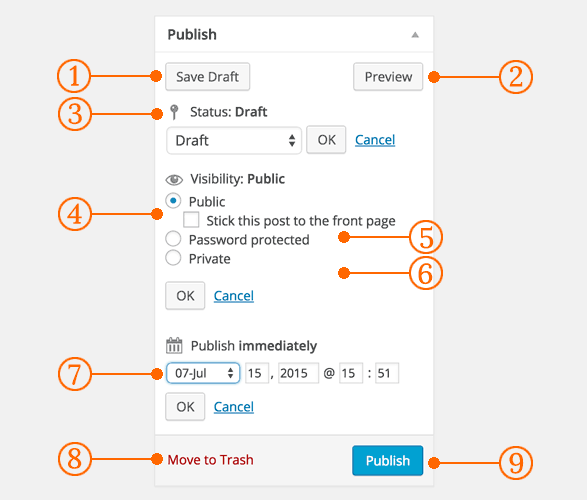
- Save Draft button stores a draft of the post or page that you are working on. It also auto-saves your posts as you write them.
- Preview button shows a live preview of your post. You can use it to see how your post will look after publishing.
- Status allows you to set a status for your post. WordPress automatically handles post status for drafts and published posts. Unless you are using a plugin to add custom statuses, you don’t need to worry about this option.
- Click on the Edit link next to visibility to expand it. The first option under visibility will allow you to make your post sticky on front-page. Sticky posts are like featured content that are displayed on top of all other posts.
- The next option allows you to password protect a post.
- The third option under visibility is labeled private. This allows you to privately publish a post on your site. The private posts will be visible to users who have the editing privileges on your site.
- Click on the edit link next to Publish, and it will display the time and date options. You can use this option to schedule posts or create back dated post.
- Move to trash allows you to delete a post. Deleted posts live under trash, and you can restore them if you need to for up to 30 days.
- Finally, the Publish button makes your post public. Remember if you scheduled a post, then it will appear on your site on the scheduled date and time.
Adding Categories and Tags
You can sort your posts into categories and tags. The categories and tags meta boxes usually appear in the right hand column, below the publish meta box.
Categories and tags help you organize your content in a meaningful and browsable format. Not only your users can easily find your content, it also boosts your site’s SEO.
Featured Image
Simply click on set featured image link, and it will bring up the media uploader popup. You can select an image from your previous uploads or upload a new image from your computer.
Questions or suggestions? Contact: networksupport@artsopolis.com