Advanced Ads is a powerful advertising plugin that has been fully vetted by ARTSOPOLIS developers. It offers multiple ways to create compelling advertising on your site, with an easy to use and understand admin dashboard.
How to add an Ad
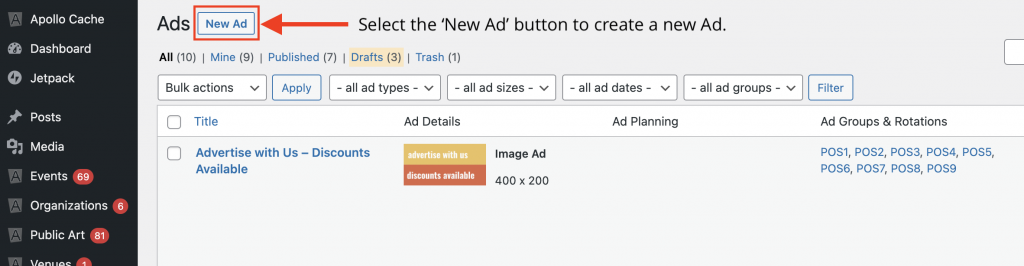
Step 1: Select the Advanced Ads plugin on your Admin dashboard left hand column, then select ‘Ads’ from the pop-out/drop down menu. This will take you to the area where most of your advertising will be managed from.

Step 2: To create a new Ad, select the ‘New Ad’ button at the top of the page.
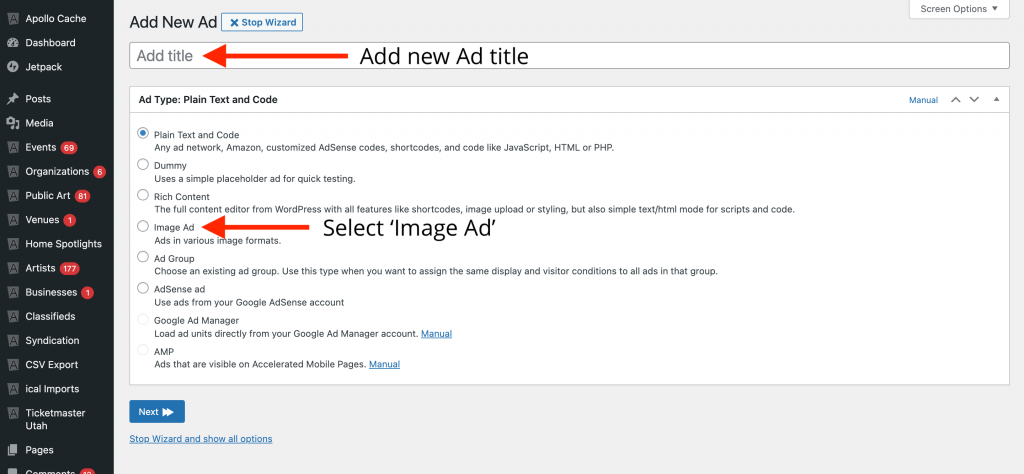
Step 3: This will start the ‘Ad Wizard’, which will help you go through the steps of adding a new Ad. The first step is adding a title. This title will not display to the public. It is for identifying the Ad in the administrator dashboard. The select ‘Image Ad’, which allow you to add a graphic or .GIF Ad in the next step. No need to select ‘Next’, as select ‘Image Ad’ will automatically release the rest of the form needed for adding an image Ad.
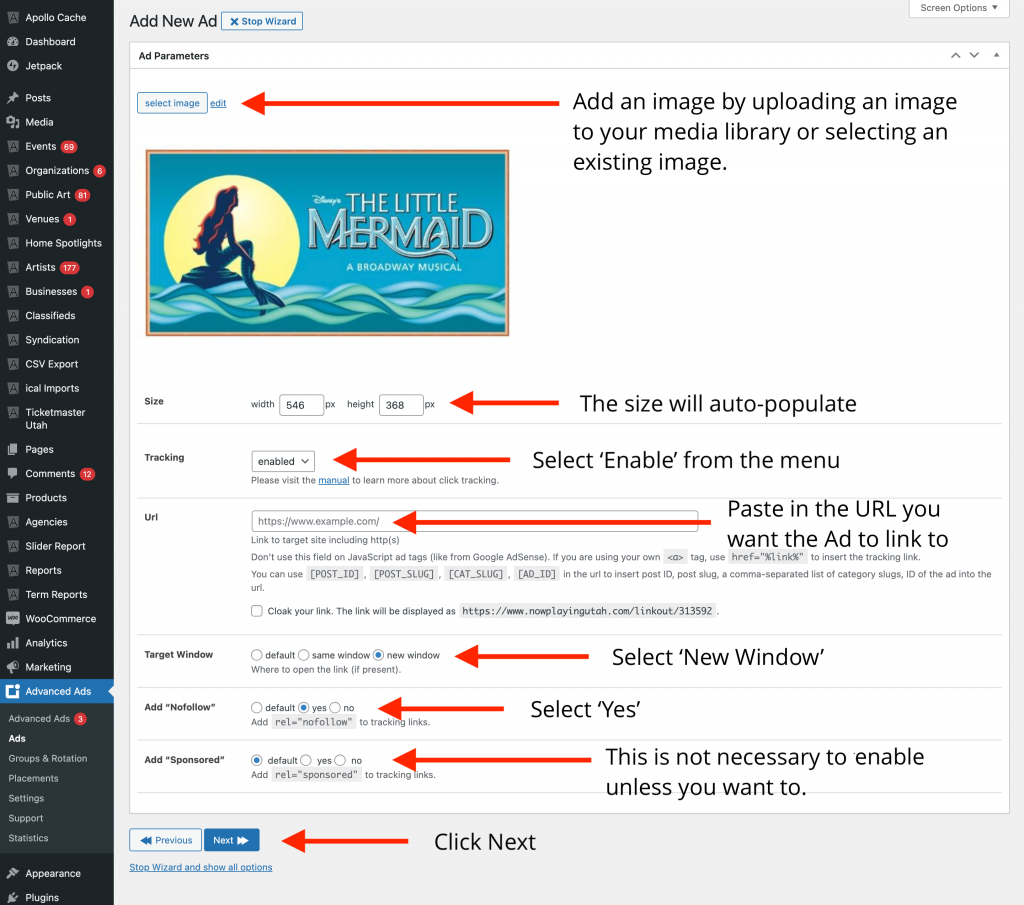
Step 4: Add a new image from your media library or upload a new one by clicking ‘Select Image’. The size is auto populated below the image. The dimensions of the Ad are up to you, but we often recommend W 500 by H 350 for banner sized Ads, but the size does not need to be exact to display.
Select ‘Enabled’ for Tracking.
Paste in the full URL (website address) you would like the Ad to link to.
Select ‘New Window’ as the Target Window. It means that the Ad’s URL link will open in a new browser window, but leave your site open as well. By selecting ‘Yes’ in the ‘Add NoFollow’ section, this tells search engines not to pass any link authority from your page to the Ad’s URL that you’re linking to – that’s good for your SEO!
Trying to Decide if you should add ‘Sponsored’ to your Ad link?
Consider this; Google sees links to a page as an endorsement. For example, you may link to a site in a blog post because you think it is a valuable resource. When you get paid to place a link, however, your motivation for doing so is different. With the ‘sponsored’ attribute added to paid links, Google can differentiate the intention behind the links displayed on your site. Now, not all browsers use this differentiation the way Google does, so it is not always considered necessary. Whether you would like to provide that differentiation to Google depends on how you would like your online relationship with your advertisers to be defined.
Step 5: Scroll up! For some reason the wizard drops you at the bottom of the page and it appears blank at first. It is not, the content is just at the top. The boxes in this step are not applicable for almost all of Network Members, so just ignore them and click ‘Next’.

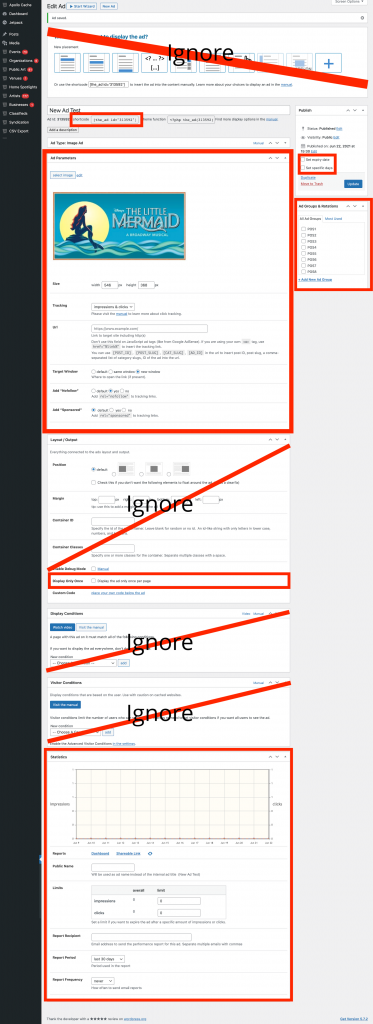
Step 6: Congratulations! You’ve created a new ad. Below is an image of the Ad detail page, where you will manage all aspects of the Ad moving forward. We have indicated which areas are to be ignored and which will be useful to you. We will examine each one individually in the sections below.
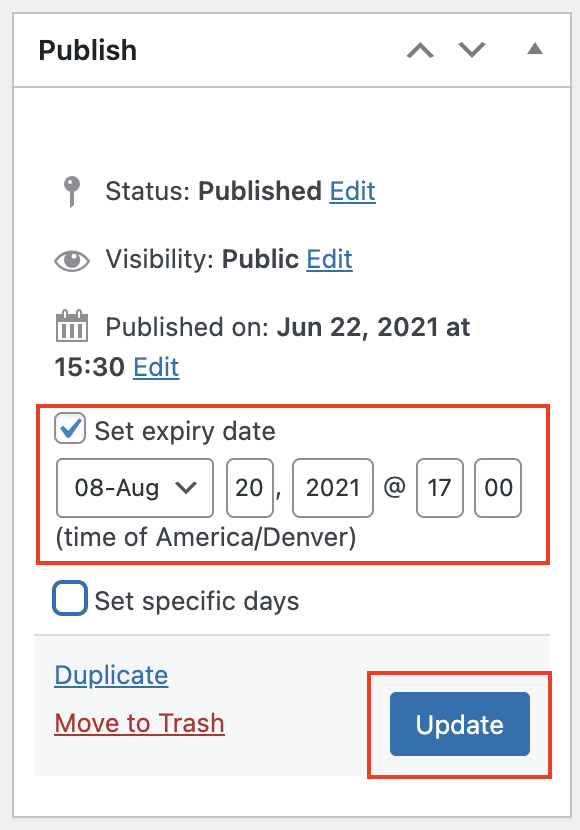
Setting an Expiry Date for your Ad
On the Ad Detail page, an expiry date and time can be set in the ‘Publish’ section, in your right hand column. Check the ‘Set Expiry Date’ checkbox and the date and time field will be released. Enter the needed information and click ‘Update’ or ‘Publish’ to save the information.
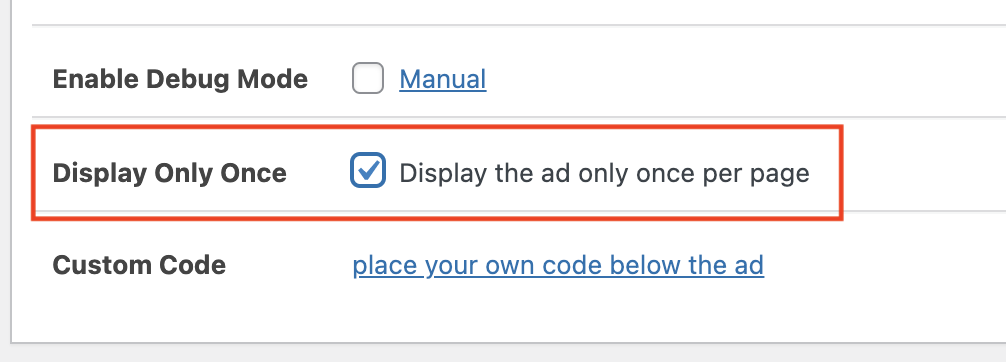
In the event that you decide to do Rotating Groups of Ads later on, to save time, please select the checkbox ‘Display Only Once’ in your Layout/Output section. Otherwise this section can be ignored.
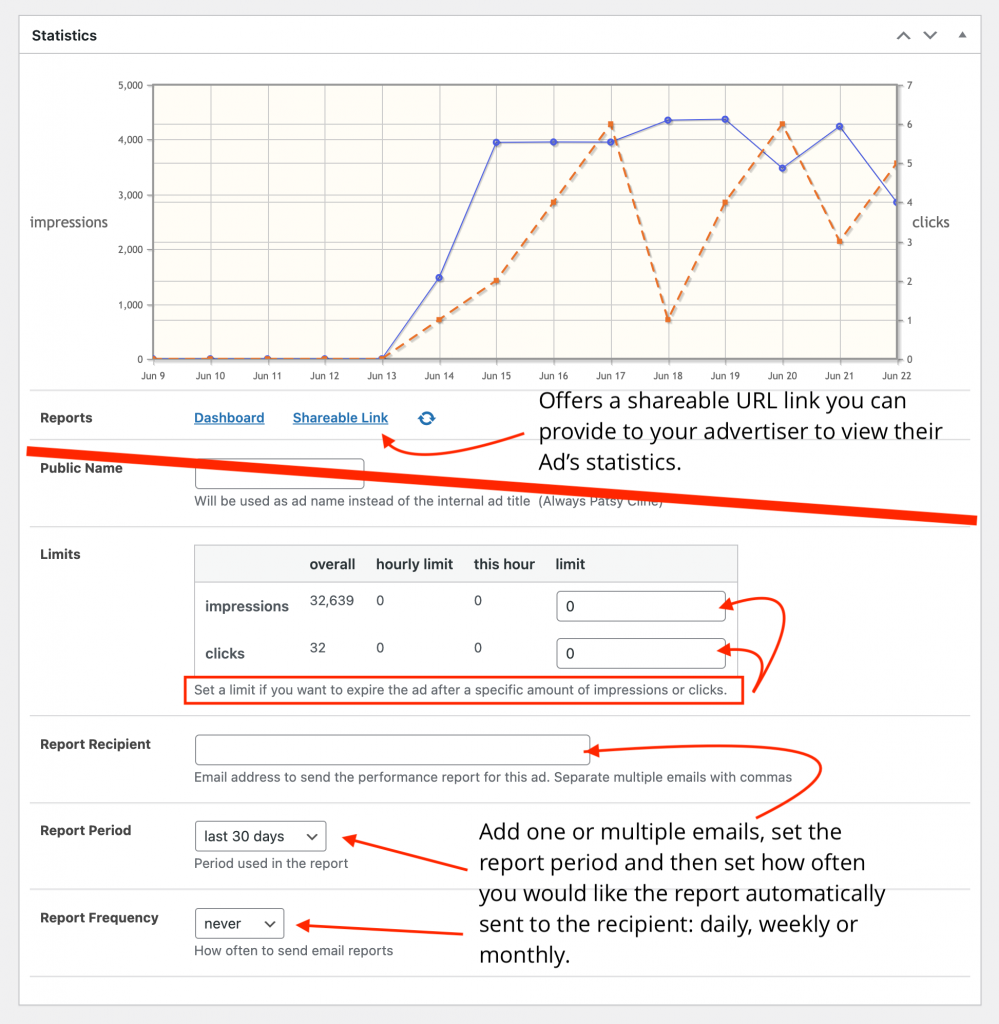
Statistics and Reporting for Individual Ads
In the Ad Detail page the ‘Statistics’ section offers multiple tools to help you monitor a given Ad campaign. You can provide your advertiser with a URL to view their Ad’s statistics. You can limit the number of clicks and impressions and Ad can receive in total, if that is how you choose to structure your advertising packages. And you can automate reporting by adding one or multiple emails, setting the reporting period and how often you would like the report sent to the recipient: daily, weekly or monthly. Please ignore the ‘Public Name’ section.
Placing an Ad in your Homepage Right Column
Once you publish your ad, it is now time to place it in your right column on your homepage. Begin by copying the ‘Shortcode’ for the Ad from the top of the Ad Detail Homepage.

In the left hand column on your site’s user dashboard, select ‘Appearance’, then ‘Widgets’. Once in ‘Widgets’ you will see a section that says ‘Apollo Primary’ or ‘Octave Primary’. If you have existing advertising Positions in your homepage right hand column, they will show up in this widget list, labeled as ‘POS1: Ad Banner’, ‘POS2: Ad Banner’, etc. Click one position to expand the drop down menu.
If you discover you do not have any Position Ad Banner widgets, please contact us at Networksupport@artsopolis.com and we will help you set them up for your homepage.
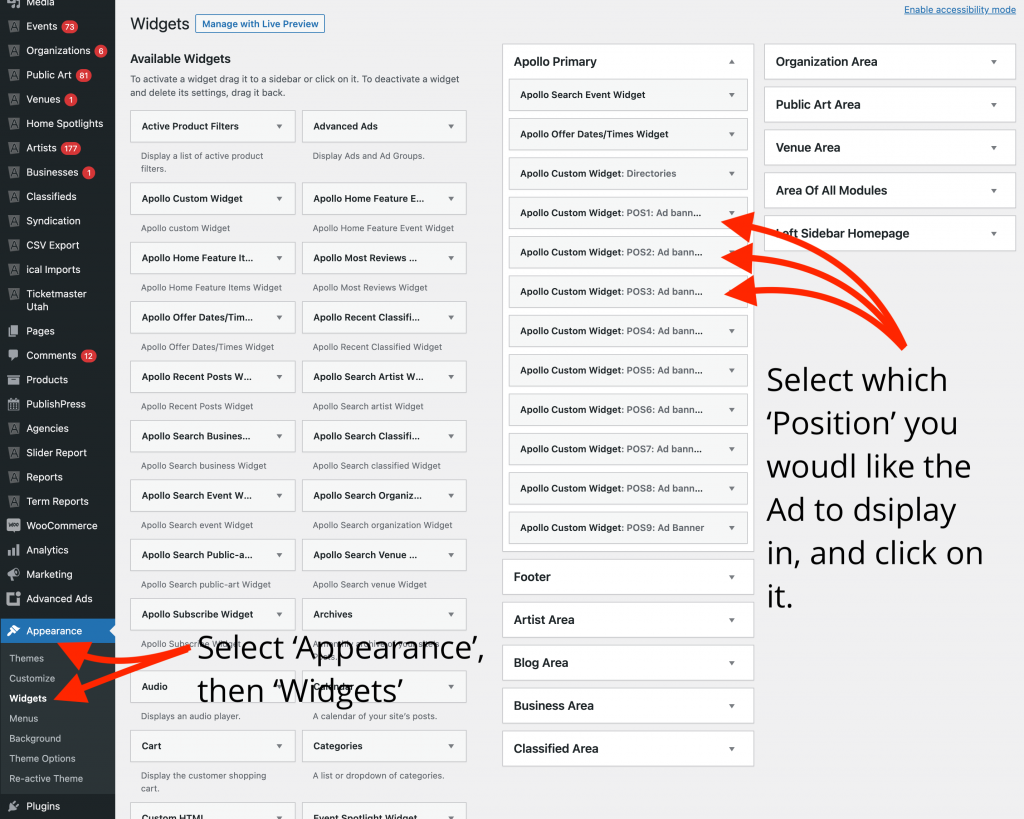
Once you have expanded the drop down menu for a ‘Position’, ensure the ‘Do Not Display Title’ box is checked then click ‘Edit Content’.
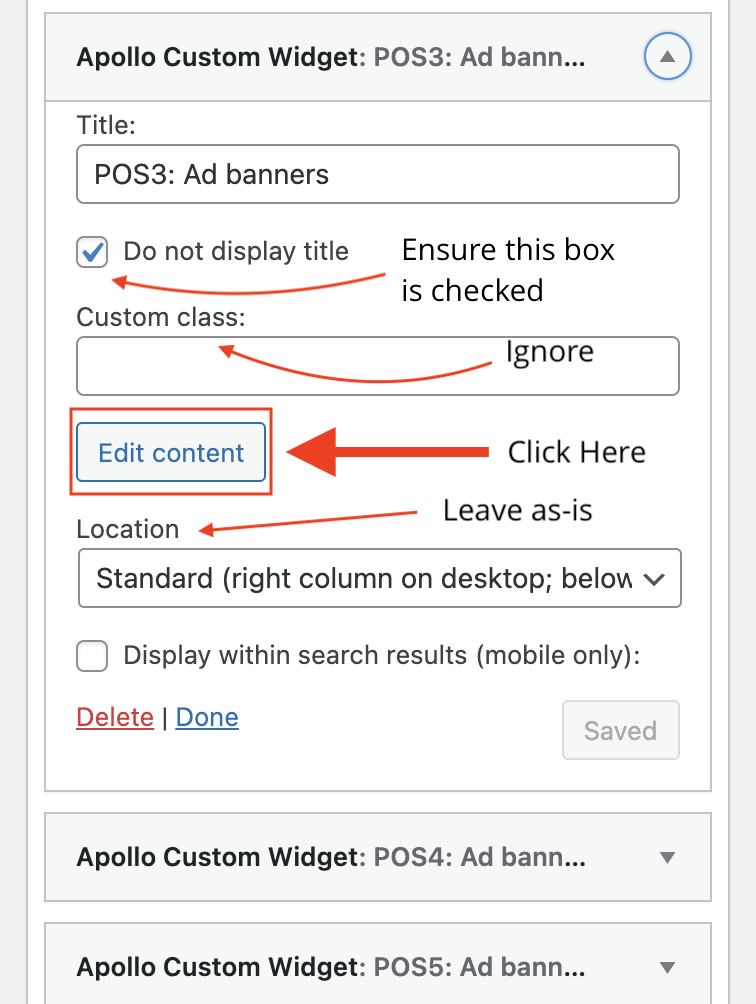
A window will open. Ensure the ‘Text’ tab is selected in the top right hand corner of the editor window. Paste the ‘Shortcode’ you copied from you Ad Detail page into the editor and hit enter to save your work. The Ad will now display in that position in the Homepage right column!
Ad Groups and Rotations
For those with a robust advertising portfolio, creating Ad Groups for your various Ad Positions and allowing those Ads to rotate within those positions, with each page refresh, is a good way to keep advertisers satisfied that they don’t need to worry about page placement in your right hand column. It also allows you to sell 1 placement instead of keeping track of your many positions and their price points.
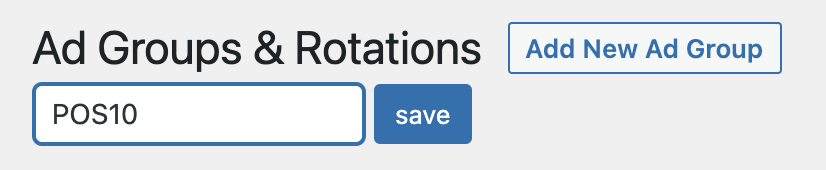
To achieve this rotating effect, you must create all of your individual Ads first. Begin the process of creating Groups by navigating to Advanced Ads > Groups & Rotations from your left hand column on your dashboard. At the top of the page, click ‘Ad New Ad Group’.

Add a new Group Name, which may be better thought of as a ‘Position Name’ for our purposes, and click save.
Find your new Group in the list, and select the name. This will release a form displaying the details of that Group. Leave the ‘Type’ as ‘Random Ads’ and the ‘Visible Ad’s set to 1. Select each Ad you would like to rotate in this ‘Position in the homepage right column. Scroll down to the bottom of the page and click the blue ‘Update Groups’ button to save your work.
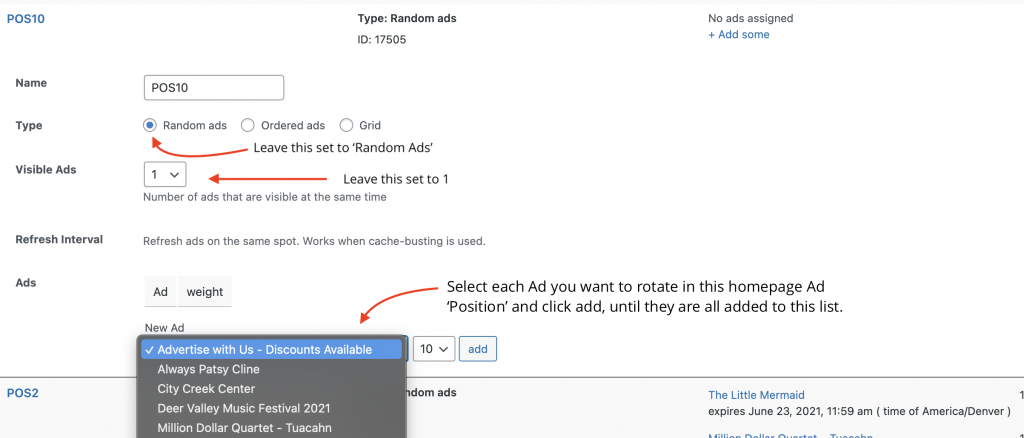
Repeat this Group creation and list selection process for all the total number of Positions you would like to randomly rotate Ads on your homepage. Once this is complete, please contact us at Networksupport@artsopolis.com and we will help you set up Group Position widgets for your homepage.
Questions or suggestions? Contact: networksupport@artsopolis.com